

If you’re anything like me, you’re taking hundreds of pictures every month documenting your life and the people in it. But what happens next? Do they live on your phone indefinitely? Does your backup plan consist of uploading them to social media? Are there pictures from your best friend’s birthday party five years ago still sitting on your SD card? If we want to get our images printed to enjoy then we need to get them off of our cameras and devices. Once we organize and store them, we can decide what to print.
Culling
Organization for me begins with culling. Culling is the process of going through your images and deciding what you want to keep, and what you can delete. Honestly, this used to be a much harder process for me. It’s digital, right? We have unlimited space! While we absolutely have more space for things when it comes to digital images, we should still only be saving our favorites. The best of the best. Of the ten pictures I took of my son blowing out his birthday candles, which ones are in focus? Are there any with his eyes closed? Is an overexcited sibling jumping in front? Do I have duplicates of the same exact thing? These are all images that I would delete. We’re not going to want to hang those unflattering pictures on our wall. Save only the best and delete the rest. I promise, it’ll save you SO much time when you’re looking for your favorites later!
Culling Phone Images
How many pictures are currently on your phone? Hundreds? Thousands? Trying to go through all 6,234 images on your phone in one sitting will definitely be overwhelming! Find some time in your day where you can spend 10 minutes going through and deleting all but your very best images. I often take a few minutes while I’m waiting for an appointment, in the school pickup line, or as I’m sitting on the couch after a long day. You’d be surprised how many images you can go through in just a few minutes.
Culling Camera Images
For images on my camera I choose to copy everything from my SD card onto my hard drive and cull from there. Deleting pictures directly from your camera can lead to a corruption of your card over time so it’s best to delete images once they’re on your computer. As an added bonus, it’s much quicker as well! Currently I cull all of my DSLR images through Photo Mechanic. There’s no time waiting for my images to render and I’m able to quickly cull through hundreds of images in just a few minutes! It has made an amazing difference in my workflow! Less time at my computer leaves me with more time with my family and truly makes staying on top of things so much easier.
Organization
I keep all of my images from my phone and DSLR on external hard drives. It wouldn’t take long for all of my images (especially the big files from my DSLR!) to bog down my computer drive. To keep things moving I make sure to store images on their own dedicated drives. Storage is cheap these days so grab a hard drive or two. I still remember how crazy it felt when I got my very first 1 GB USB drive. I paid what felt like a small fortune (even on sale, it was $40!) and suddenly had so much space. How would I ever fill that up?! I could put EVERYTHING on that. It’s safe to say I have a few more terabytes of storage now and can’t believe how relatively cheap it is for so much space!
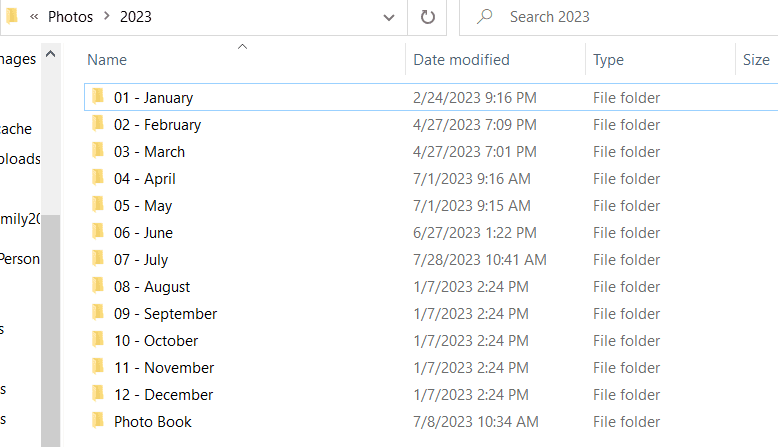
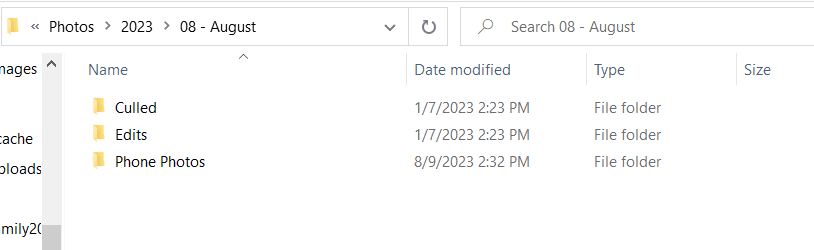
Organizing and storing digital photographs on my hard drive is vital to being able to find what I need quickly. For my personal photos I have a folder for each year of images. Within each year’s folder I have subfolders for each month, with folders for my phone photos, my culled images from my SD cards, and my final edits. Obviously, if you only have phone images you might not need as many folders as I do. Everyone’s needs will be different and so will your organization. In the past I’ve tried folders with the four seasons within a year’s folder. I’ve tried having separate folders for different activities but that got really messy really fast. And where do you put things that are just every day things? That phase didn’t last long. Find what works for you and feel free to change things if you find a better way. Make it work for you! Get your organization set up and use it starting today. Don’t worry about all of your old photos until you have time to break it up into chunks so you don’t get overwhelmed.
Backing Up Images
Do you have a plan for backing up your images? If your phone were to stop working would you be able to access all the photos on it? There are so many different cloud based options for not only storing, but moving your images from your phones to your computer. Dropbox, Amazon, and Google all have free options and make it as simple as opening an app on your phone and waiting for your images to load. Then you can easily access them from your computer and copy them to your hard drive. I have been using Dropbox to move my images off of my phone for over a decade and it works great.
Having multiple copies of your images is important in the event that something happens. Hard drives can fail, phones and computers can break, and natural disasters could occur. Obviously nobody wants to think about worst case scenarios, but it’s easier to have a system in place before you need it, than wish you had after it’s too late. I currently have all my images stored on my hard drive, a second hard drive that is in a fire proof safe, and also backed up with my client gallery delivery service. I haven’t had an opportunity where I needed a backup, but I’m glad to know that I have a plan in place.
Today’s Takeaway
Where can you routinely find 5-10 minutes in your day to delete unnecessary images off of your phone? Decide what file organization you think will work best for you and create the files on your drive. Take a few minutes to transfer the culled images from your device into their new home.
Read the rest of the Heritage Series here:
Part 1: How to Take, Organize, and Print your Personal Photographs


+ COMMENTS
add a comment